Hello fellow Rift adventurers! An Ascended! In the words of Rift NPCs, live gloriously, die heroically. Lol. Welcome to the Blitz Framework guide. This guide breaks down three of the best warrior DPS builds in the game, all of which use a very similar framework
BUILD OVERVIEWS:
- Blitz (61RB /4 WC /11 Tempest) Best solo and most reliable but less dps
- BlitzIce (61 RB /4 WC /11 Reaver) Best melee/ranged hybrid (best for bos)
- BlitzLord (61 RB /4 WC /11 Warlord) Best melee only dps (highest dps)
CREDITS: Redfuryy, Kenislaw, Nivco, as well as Vueren and Shas for being part of the theory crafting process. For those who wish to repost the guide please give appropriate credits.
BEFORE YOU BEGIN:
Please be aware of the following:
- Performance Considerations: This build's effectiveness can be influenced by your CPU and server lag. If you're using a low-performance computer or encountering high lag, consider using older warrior builds.
- Optimization Note: This guide focuses on practical gameplay strategies to help players understand and effectively utilize the build. The rotations presented provide a solid baseline understanding and are designed for ease of use and accessibility. Advanced techniques such as incorporating Fiery Burst, Internal Global Cooldown (IGCD) skipping, or exploits are not included in this guide.
- Alternative Techniques: While this guide primarily utilizes a 6 IGCD framework for simplicity, there's also a more advanced 7 IGCD method briefly discussed under Advanced Techniques and Tips.
- Macrowait: The macros in this guide use 0.85 as the preferred macrowait time. However, this value may vary for individual users. Feel free to adjust it accordingly.
- FRAMEWORK
- BLITZ
- BLITZICE
- BLITZLORD
- ADVANCED TECHNIQUES AND TIPS
- HISTORY AND DEVELOPMENT
- FAQs
- NOTE FROM REDFURYY
- ADDITIONAL SPECS USING THE BLITZFRAMEWORK
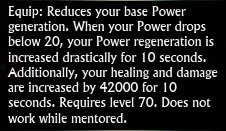
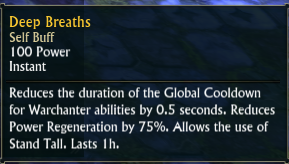
Achieving high DPS output for warriors hinges on the ability to double proc Living Weapon (LW). LW is the buff you can get when your power reaches below 21 with the warrior eternal equipped. Using the macros below, you can double proc LW, making it so you get two procs of LW instead of the intended one. Whenever LW expires, you will want to first cast deep breaths, then use these macros to regain a double procced LW, canceling deep breaths in the process and then begin/continue your rotation. Essentially you will have 100% uptime with LW without requiring any other mechanics. Without using more advanced techniques, you will have 6 normal IGCDs between LW procs. There are two primary macros that excel at this task. The first macro is more stable but works exclusively for the Blitz build.
The second macro is versatile, functioning across all three builds while also enabling Blitz to self-heal more effectively. Its downside is that it can be heavily affected by server lag and computer performance issues.
This guide uses 0.85 as the macrowait time but please be aware this number can be different for individual users. Please feel free to adjust your macrowait time to find your best timing.
BLITZ ONLY MACRO:
#show jolt
stopcasting
macrowait 0.85
//^insert preferred time, 0.85=850ms, varies between users.
cancelbuff deep breaths
cast jolt
BLITZ (with more heals) / BLITZICE / BLITZLORD macro:
#show Stand tall!
stopcasting
macrowait 0.85
//^insert preferred time, 0.85=850ms, varies between users.
cast @self Stand Tall!
macrowait 0.01
cancelbuff deep breaths
//add more cancelbuff deep breaths until 25 lines
BLITZ:
Blitz is the most stable of the three builds, requiring only Jolt and Deep Breaths to proc Living Weapon, but it outputs lower DPS. This build is ideal for situations with high lag or on low-performing computers. Alternatively, you can use the second framework macro to incorporate both Jolt and Stand Tall! for self-healing. With double-procced constant self-heals, this build may be the best solo build in the game. It can nearly heal your entire health bar every few seconds while maintaining high single-target DPS. For soloing monsters, feel free to enhance this build with shields or tanking items. Its resilience and adaptability make Blitz an excellent choice for any warrior looking to conquer challenging content or needing extra heals.
BLITZ MACROS:
RB MACRO
#show Burst Synergy
suppressmacrofailures
cast Burst Synergy
cast Rift Burst
cast Rift Strike
cast @focus Rift Strike
cast @lasttarget Rift Strike
cast Shock Pulse
cast Fading Light
cast Break Free
MAIN MACRO
#show Rift Strike
suppressmacrofailures
cast Rift Strike
cast @focus Rift Strike
cast @lasttarget Rift Strike
cast Stonespear
cast Frost Strike
cast Shock Pulse
cast Thunder Strike
cast @self Power Manipulation
cast Fading Light
cast Break Free
OTHER BUTTONS ON YOUR BAR:
- Deep Breaths
- Power Manipulation
- Icy Burst
- Flamespear
- Blade of the Ascended
- Avatar of the Rift
- Avatar of Flame
- Avatar of Wind
- Empower
- Enhanced Conductivity
- Fiery Burst
- Rift Spear
Use the double proc framework methods outlined above and then ensure Flamespear remains active on your target, maintain Rift Strike while in melee range, and then consistently use the main macro. At 3 attack points, use burst synergy and then rift burst for your first high priority finisher. This will give you 3 procs of Rift Burst. For any subsequent finishers when RB is down, use Icy Burst. Add power manipulation to your macros or put it on your bar and use it manually. Other methods may involve employing Fiery Burst as a finishing move or utilizing 7 IGCD rotations. However, these techniques are currently beyond the scope of this guide.
Visual Rotation:
Preload>Double proc>Flamespear>Rift Burst macro until 3x attack points>Icy Burst>Main until 2x attack points>Double proc>Flamespear>Icy Burst>Main until 3x attack points>Rift Burst macro until 2x attack points>Double proc>Flamespear>Icy Burst>Main until 3x attack points>Icy Burst>Main until 2x attack points>Start over
BLITZICE:
BlitzIce reigns as the premier warrior DPS build, offering versatility in both ranged and melee combat, making it the optimal choice for BOS encounters. If you aim to master a single warrior build for DPS, this should be your go-to. This build leverages Soul Sickness to gain an additional 6% DPS bonus on top of Blitz's DPS. The "Ice" in BlitzIce pays homage to Riftblade's older Reaver DPS tech. Combining versatility, power, and a nod to classic strategies, BlitzIce stands as a testament to the evolution of warrior DPS.
BLITZICE MACROS:
Same as Blitz. Only difference is you will add Soul Sickness to your other buttons and replace Shock Pulse with Ravaging Strike.
Other Buttons on Your Bar:
- Deep Breaths
- Power Manipulation (even if I don’t mention it in rotation use it)
- Icy Burst
- Flamespear
- Blade of the Ascended
- Soul Sickness
- Avatar of the Rift
- Avatar of Flame
- Avatar of Wind
- Binding of Affliction
- Fiery Burst
- Rift Spear
BASIC ROTATION:
The rotation for BlitzIce closely mirrors that of Blitz. The same sequence is followed, with the added step of ensuring that Soul Sickness is applied to your target alongside Flamespear. Similarly, alternative methods for BlitzIce may involve utilizing Fiery Burst as a finishing move or employing 7 IGCD rotations.
Your priority should be Rift Strike>Soul Sickness>Flamespear>Rift Spear>Stone Spear>Frost Strike
BLITZLORD
BLITZLORD FUNCTIONALITY AND BACKGROUND:
BlitzLord stands as quite possibly one of the highest single-target DPS builds for warriors and possibly in the game, though it excels exclusively in melee range. Historically, Warlord variants have been among the most challenging Riftblade builds to master, possibly featuring the most difficult rotation in the game. Fortunately, BlitzLord is somewhat easier than its predecessors, but it remains a complex build to execute.
This build leverages Backhand, which effectively acts as an additional IGCD move due to its frequent procs. It synergizes with Breaking Blow, Rift Burst, Burst Synergy, double-procced Living Weapon, Icy Burst IGCDs, and 7 IGCD variants to maximize DPS output. However, BlitzLord's reliance on 100% melee uptime makes it less suitable for core BOS raiding. Instead, consider using this build for content like IROTP and TDNM, where its strengths can be fully utilized. For players seeking the ultimate melee DPS challenge, BlitzLord offers an unparalleled experience.
ADVANCED TECHNIQUES AND TIPS:
Seven IGCD Framework: You can achieve higher DPS using a 7 IGCD framework. To do this, on your 7th IGCD between LW procs, use only Seasoned Strike due to its low power cost. This ensures that you will have enough power to immediately go into deep breaths. Additionally, ensure that either Fluid Movements is specced into or your raid has power buffs active.
Making Use of Energy Potions: As a byproduct of these specs being no drain any attacks that use power after your eternal uptime is gonna significantly mess up your dps due to having to wait for power, keep a Major Energy Potion on your bar in-case this happens.
Manual Double Proc: For the highly dedicated, manual activation will always be more reliable than relying on macrowait. To execute this, simply remove the macrowait from the DP macros and activate the macro manually when power reaches 21 after Deep Breaths is canceled.
Dire Corruption Into Spin (Blitzice): Cast dire corruption on Azranel
during spin since you’re already not doing any damage, the lingering dot is a gain.
Stand Tall Defi: You can change the Stand Tall! In the macro to put it on the Defi in groups that require it.
LIST OF KNOWN PRELOADING TECHNIQUES:
- Time Omnox: Equip and unequip Omnox so it has the right timing upon engagement.
- Preload Precision Strikes: Use Thunder Strike to activate Precision Strikes, then quickly save and exit the build to keep it active while Ethereal Strike is specced in.
- Rift Burst Preparation: Ensure at least one full rotation of Rift Burst has occurred before engaging, so your Rift Burst benefits from the 65% DPS boost. In addition, time the second rotation as well to achieve six Rift Bursts in a row.
- Enhanced Setup Technique: Spec into Energy Reserves, cast Avatar of the Rift and your second preferred Avatar, then respec back into Runner’s Training. Save and exit to benefit from all three.
- Avatar Buffing: Avatar of the Flame and Blade of the Ascended both benefit from max AP at the time of casting it. Create a setup that maximizes ap at the time of casting them.
DPS Warriors in Rift have historically underperformed compared to other classes. Despite their potential, many warrior builds fell short in terms of DPS output. This challenge motivated us to find a solution. After extensive testing, tweaking, and countless hours of gameplay, we developed the Blitz Framework. The Blitz Framework represents the culmination of our efforts to optimize warrior DPS in a way that can likely outperform many other classes.
FAQs:
Q: Why not use 2 Warchanter for BlitzLord so you will be able to get 13 WarLord?
A: Because you will then not be able to preload Rift Burst.
Q: Why do you add stopcasting and spam cancelbuff deepbreaths 25 times in the blitzframework macros?
A: It helps to improve it's ability to proc and stabilizes the macros
Q: When will you upload BlitzLord?
A: We are still working on it and will hopefully be releasing it soon!
NOTE FROM REDFURYY:
Thank you to everyone for allowing me to be a part of this incredible community and to theorycraft with you over the years. (even the pvpers) Your support and collaboration have been invaluable. I hope you all enjoy these new builds and continue to push the boundaries of this great game. I love you and look forward to hearing from you all!
ADDITIONAL SPECS:
The blitz framework can be implemented into multiple different specs such as 61 reaver, 61 warlord, and others. These will not be covered in this guide but will be released under a separate one. If you have any questions about those guides please reach out to Nivco@Deepwood or wank__ in-game.
- BLITZUSERPNG.png (234.84 KiB) Viewed 24250 times